

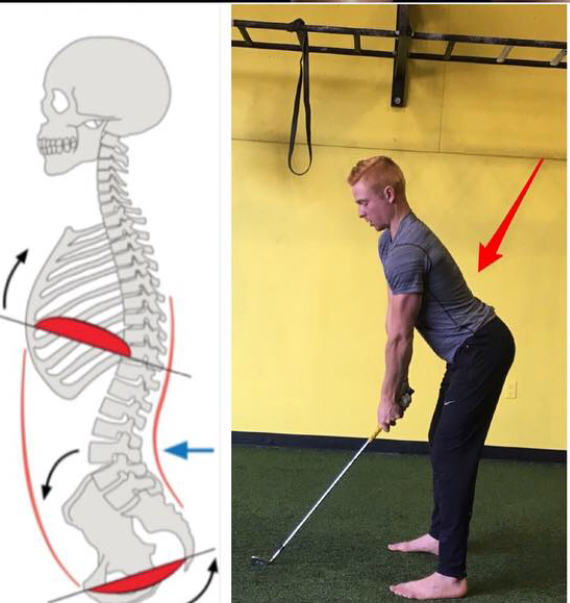
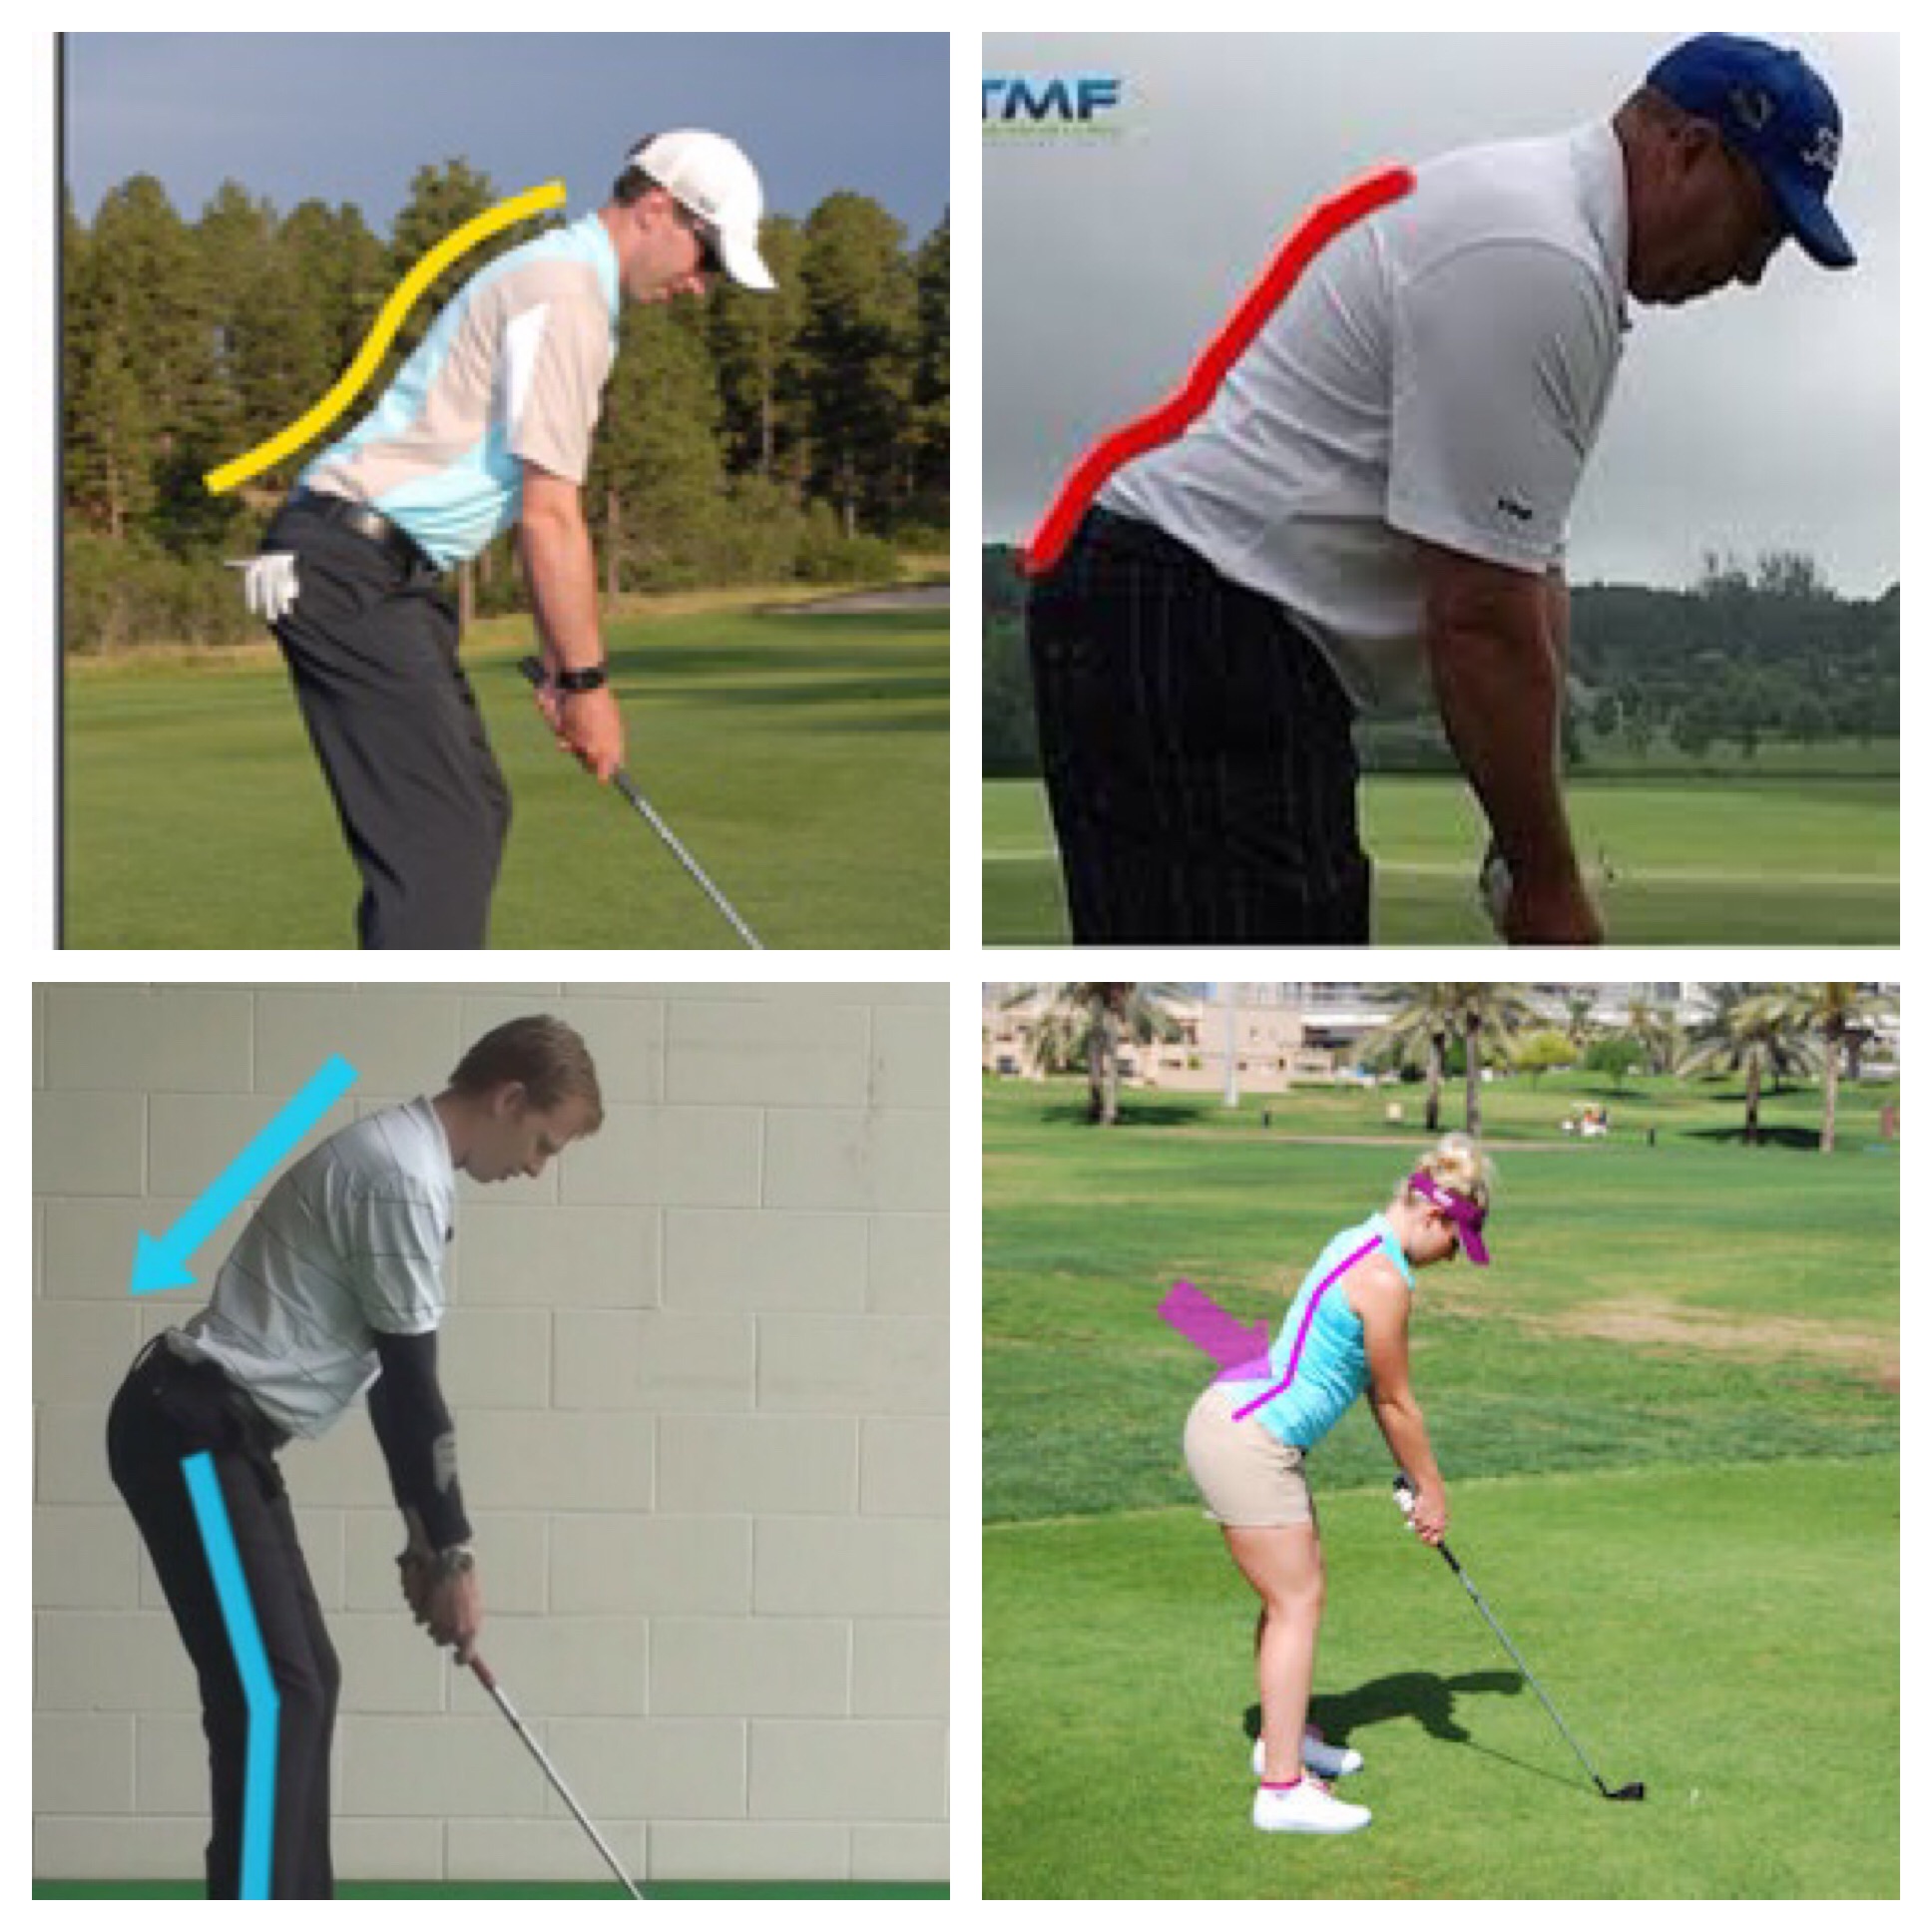
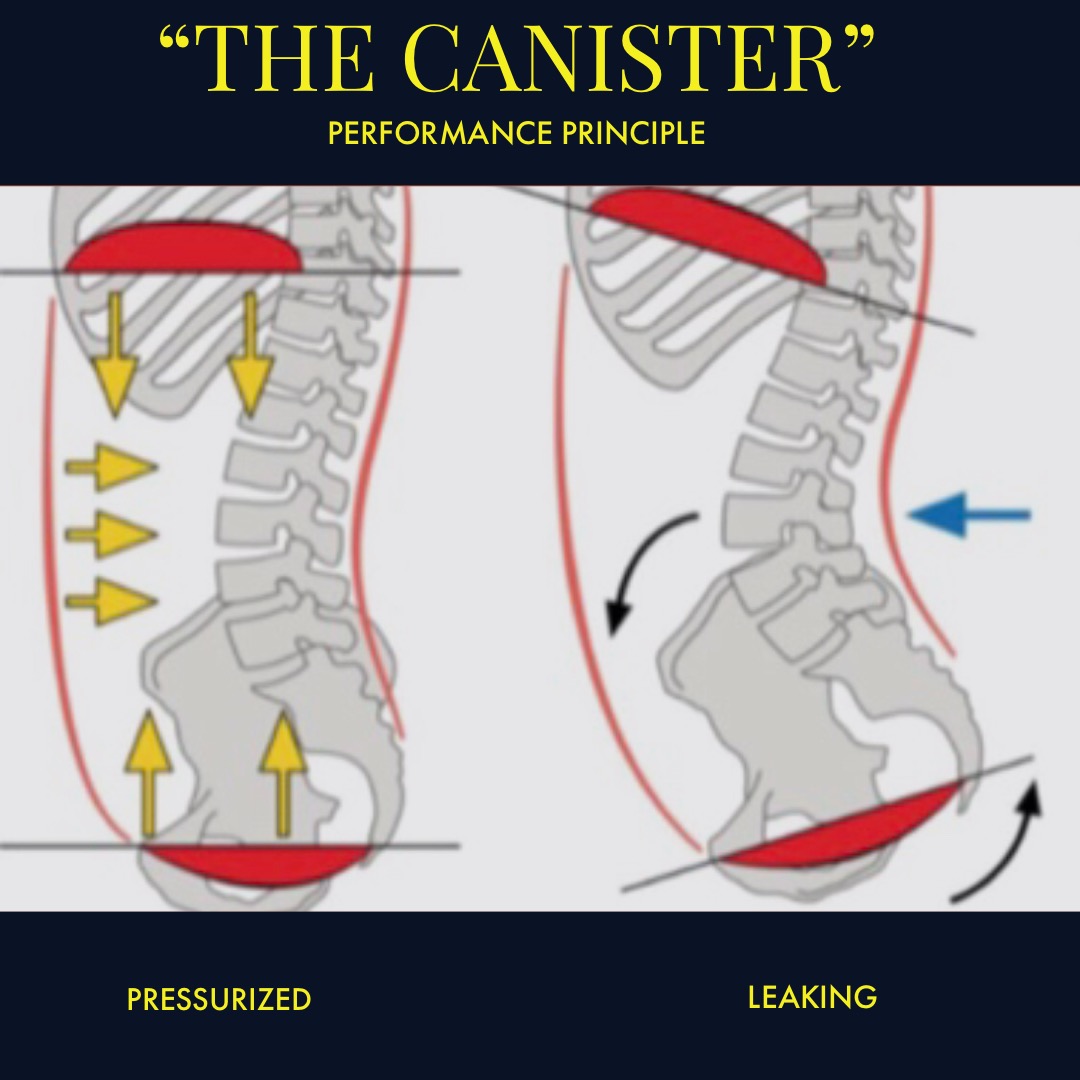
Having worked with some of the best players in golf, one constant we see in a lot of our great players is “S” posture. It’s something we see across the spectrum from top level players tosome of the teens we work with. So what is it, and why should it be a concern for coaches and players? When talking about this type of posture, I like to start with the pelvis. When it comes to performance, our joints tend to operate when in neutral position. When out of neutral, other joints tend to have to compensate and in golf these types of compensations tend to lead to small changes in sequencing and swing planes. With that being said, typically when we see someone with an “S” posture it means they tend to set up w anterior pelvic tilt. Typically with an anterior pelvic tilt also comes a posture where the ribs are flared- meaning they are out of neutral alignment as well. This is where the problem lies. First of all, when the pelvis is not neutral, then a golfer will tend to get more rotation through the lumbar spine than is optimal, putting additional stress on the lumber spine. This is where many golfers start to develop chronic low back issues. The second problem is a leak in their thoracopelvic canister like in the first diagram. If you think about the rib cage and pelvis being the top and bottom of a can, in order for the can to be solid they need to line up over each other. With a tilted pelvis and rib cage, the can now leaks air out of the top and bottom of the can. When an athlete is able to create maximal pressure inside the can, he/she is able to maximize performance while also limit risk for injury due to more optimal patterns. This is critical for long term success for any golfer due to the fact that it provides optimal performance, consistency, better patterns, sequencing, and most of all, limits injury.
Now that we know what it is, how do we change it in the golf swing? The best strategy is working on it in the gym so it starts to transfer in your golf swing. Then using some different strategies to set the body up for success prior to playing. These two in combination start to groove better patterns for the player, while also bringing better alignment in the setup. When it comes to training it in the gym, the first thing is awareness of what the player defaults to vs, what you are asking them to do, and then teaching them how to feel it. Once an athlete is able to feel it, you then start with isometric drills so the golfer starts to be able to make the connection between the brain and contracting the right muscles to facilitate the proper alignment and contractions. Once a player starts to own positions using isometrics, then we progress them to more dynamic exercises. It’s just like working on something new in your swing w a coach. You first start w wedges and high irons making half swings and slowing things down, and as the new change starts to be grooved into the system you work your way up to pulling out the driver. It is essential to slow things down like this in order to allow the brain to process the new changes trying to be implemented.
Here are 4 drills that can start to teach you how to find neutral pelvis and ribs in the gym:
1. The first drill is best done if you are barefoot. The feet are your roots of the tree and being able to use your roots better will allow for better hamstring activation which is what is essential for getting your pelvis to move. Attach a band just above your knee on the leg you load into on your back swing. Get in your golf set up, and then you want to step back so you can really feel your hamstring engaging. Start by going as far posterior pelvic tilt as you can, then anterior tilt as far as you can and then find the middle and hold for a 5 count. Repeat this 10 times. Finding the neutral will allow for you start to know where neutral pelvis is!
2. The second drill is used to start to get the glutes to fire and recruit the adductors and hamstrings to allow for pelvis to get to neutral. Make sure your toes are tucked under, put a yoga block between the knees, sit back toward your heels, and come to neutral squeezing the block as hard as you can. You should have maximum full body tension, and you should be shaking if done right. 10-15 reps holding the squeeze for a 2 count.
3. The third drill is a low to high sphinx drill. This will start to teach you how to bring the ribs to neutral and create a solid pressurized top of your can. This is a great drill to prime the tspine and work on extension and shoulder depression as well as upper body tension. Start with your hands as far as you can away from your body with belly button on the thighs. Dial the hands into the floor as hard as you can, and then wrap your elbows down and depress your shoulders. Don’t let them come up when you come back into extension. Think about pulling your sternum down to your pelvis and keep your head neutral, drive your head back towards the wall behind you. Hold for a 10 count. Then bring your hands in 3 inches closer and repeat 3-4 more times.
4. The last drill ties it all together pressurizing the top and the bottom of the can. Place a yoga block above the knees and imagine you are using an ab roller. Tuck the pelvis to neutral and squeeze the block as hard as you can. Max full body tension and protract through the shoulder blades pushing your body away from the floor as hard as you can, pull your belt buckle into the floor. 3 x 20 seconds. These four drills done in this sequence start to set the stage for reprogramming the system to have the alignment you want for any other exercise done in the gym. This is the foundation which should be used to drive harder exercises in the gym.
Here are 3 drills used as a priming series: This should be done prior to playing or hitting balls which will drive better performance but is more of a short term fix. Think of it like driving a better signal on a cell phone. It allows the golfer to take the signal quality from 1/5 bars to 3-4/5 bars in the matter of minutes to allow for better sequencing.
1. The first drill is used to start to get the glutes to fire and recruit the adductors and hamstrings to allow for pelvis to get to neutral. Make sure your toes are tucked under and put a yoga block between the knees, sit back toward your heels and come to neutral squeezing the block as hard as you can. You should have maximum full body tension, and you should be shaking if done right. 10-15 reps holding the squeeze for a 2 count.
2. Tuck the pelvis so that the butt is slightly off the wall and the the lumbar spine is touching. Squeeze the block as hard as you can and protract the shoulders. Imagine there is a post in your hand, and you are trying to drive it into the floor as hard as you can. Goal is to get your legs to shake. 3 reps x 15 sec
3. Place a yoga block above the knees and imagine you are using an ab roller. Tuck the pelvis to neutral, and squeeze the block as hard as you can. Max full body tension and protract through the shoulder blades pushing your body away from the floor as hard as you can and pulling your belt buckle into the floor. 2 x 20 seconds.
Check Out More Of Our Golf Performance Training Options Below
I have some curve in my back. My pelvis tilts backwards and my right arm hangs lower than left during a round.any exercises or set up tips.? I can play really well for a while then crumble.thanks